本课程是基于 实验楼 线上环境制作的,因此文档叙述和截图均与其有关。使用其他实验环境也没有太大影响,实验步骤是类似的。
一、实验说明及介绍 1. 环境介绍 本实验环境采用带桌面的 Ubuntu Linux 环境,实验中可能会用到桌面上的程序:
XfceTerminal:Linux 命令行终端,打开后会进入 Bash 环境,可以使用 Linux 命令
Firefox:浏览器,Web 应用会用到它
GVim:非常好用的编辑器,最简单的用法可以参考课程 Vim编辑器
Eclipse:Eclipse 是著名的跨平台的自由集成开发环境(IDE)。主要用来 Java 语言开发,但是目前亦有人通过插件使其作为 C++ 和 Python 等语言的开发工具
2. 实验简介 很多同学可能先后学习了 Spring、Struts 以及 Hibernate 课程(学习本项目课之前,您也应该先学习这三门课程):
今天我们就带给大家 3 种框架结合应用的实例,也就是常说的 SSH(Spring + Struts + Hibernate)集成框架,它是应用十分广泛的一种 Java Web 应用程序开发框架。通过这个例子,你会感受到 SSH 框架的强大之处,也会对之前学习的各种框架的应用和理解更加清晰、透彻。
本次项目课的场景,假设为一个简单的用户管理网站,在数据库中存在的每一个用户都可以登录网站,然后可以在网站上面进行用户管理(增删改查)。实际的使用场景可能不同,这里的场景假设只是为了便于大家学会理解和应用其中的相关操作 。
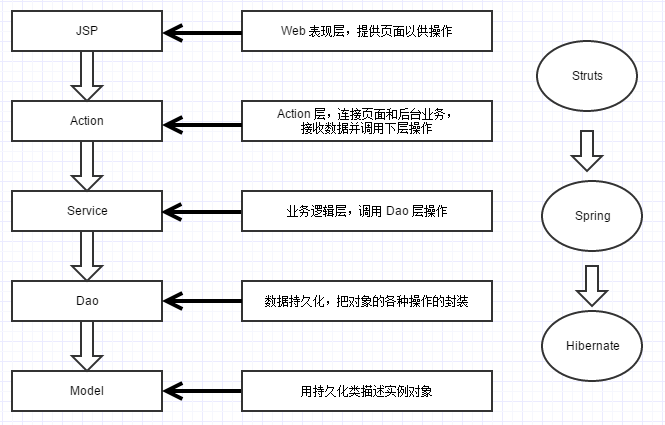
二、SSH 框架分析 SSH 框架也体现了典型的分层结构,分层有很多好处,例如项目整体的构架更加清晰,代码也更易维护和扩展。
通常来说,SSH 整体上大致可以用下图描述:
在后面的编码过程中,最好结合这个框架分析图来理解,会更加清晰。
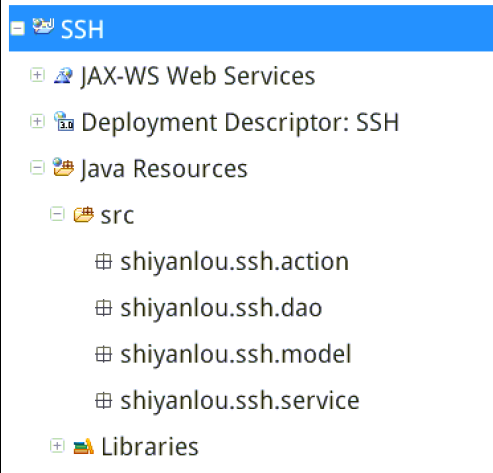
三、项目准备工作 1. New Project 新建 Dynamic Web Project,命名为 SSH(遇到窗口显示不完整的问题,请将窗口放到最大化即可)
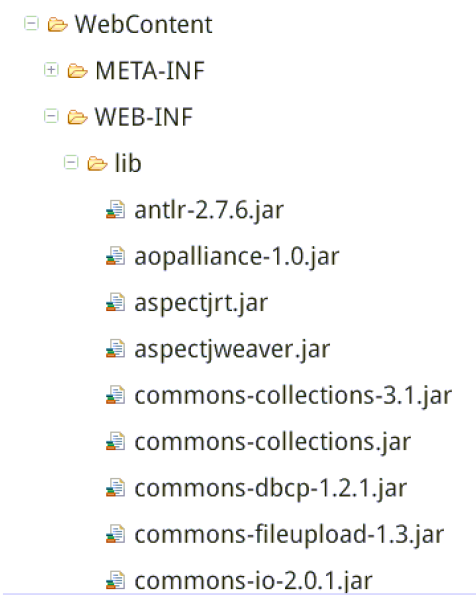
2. 导入依赖包 先下载依赖包(由于依赖包比较大,这里分成了 3 个小包分别下载,但都要导入到项目中):
1
2
3
$ wget http: //labfile.oss.aliyuncs.com/courses /339/lib -part1.zip$ wget http: //labfile.oss.aliyuncs.com/courses /339/lib -part2.zip$ wget http: //labfile.oss.aliyuncs.com/courses /339/lib -part3.zip
分别解压 3 个小包,解压之后,将 3 个部分所有的 jar 包 ,全部都复制到工程目录下的 WebContent/WEB-INF/lib 目录下面(截图只包含部分 jar 包):
3. web.xml 修改 web.xml(WebContent/WEB-INF/web.xml)文件如下:
1
2
3
4
5
6
7
8
9
10
11
12
13
14
15
16
17
18
19
20
21
22
23
24
25
26
27
28
29
30
31
32
33
34
<?xml version="1.0" encoding="UTF-8"?> <web-app xmlns:xsi ="http://www.w3.org/2001/XMLSchema-instance" xmlns ="http://java.sun.com/xml/ns/javaee" xsi:schemaLocation ="http://java.sun.com/xml/ns/javaee http://java.sun.com/xml/ns/javaee/web-app_3_0.xsd" id ="WebApp_ID" version ="3.0" > <display-name > SSH</display-name > <welcome-file-list > <welcome-file > login.jsp</welcome-file > </welcome-file-list > <listener > <listener-class > org.springframework.web.context.ContextLoaderListener</listener-class > </listener > <context-param > <param-name > contextConfigLocation</param-name > <param-value > classpath:beans.xml</param-value > </context-param > <filter > <filter-name > struts2</filter-name > <filter-class > org.apache.struts2.dispatcher.ng.filter.StrutsPrepareAndExecuteFilter</filter-class > </filter > <filter-mapping > <filter-name > struts2</filter-name > <url-pattern > /*</url-pattern > </filter-mapping > </web-app >
4. package 在 Java Resources/src 目录下,新建各层 package,方便后面的编码工作:
PS:后续代码的讲解都在代码的注释中。
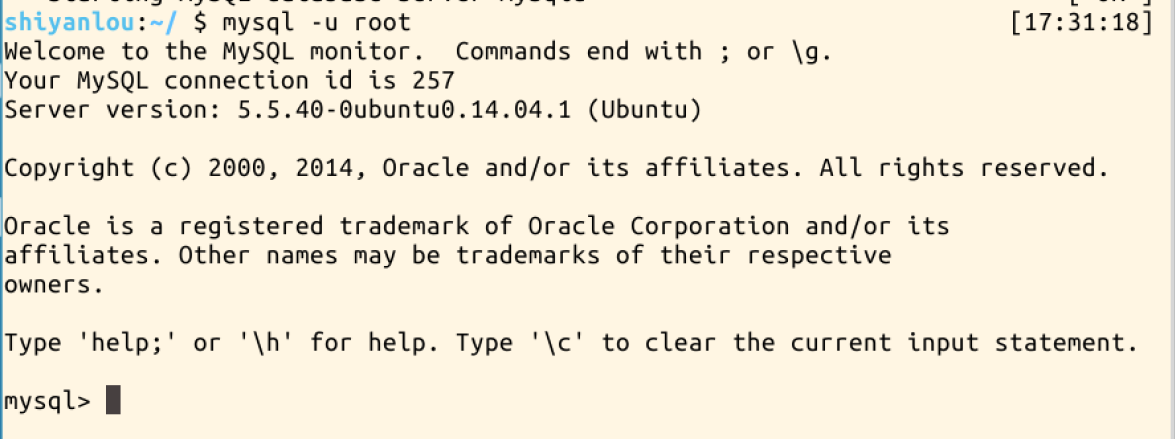
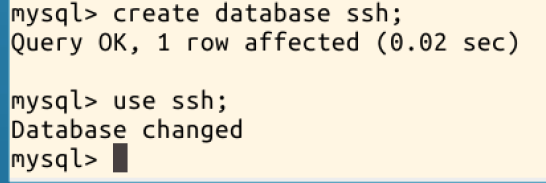
5. MySQL (1)启动 MySQL 服务 输入密码:shiyanlou
(2)登录 MySQL
(3)新建数据库 ssh
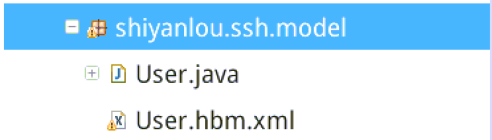
四、Model 在 model 下新建一个实体类 User.java,以及它的映射文件 User.hbm.xml:
1. User.java 这个对象包含一个 id 主键,一个 name 属性以及 company 属性,很简单。
1
2
3
4
5
6
7
8
9
10
11
12
13
14
15
16
17
18
19
20
21
22
23
24
25
26
27
package shiyanlou.ssh.model;public class User private int id; private String name; private String company; public int getId () return id; } public void setId (int id) this .id = id; } public String getName () return name; } public void setName (String name) this .name = name; } public String getCompany () return company; } public void setCompany (String company) this .company = company; } }
2. User.hbm.xml 根据上面的对象,它的配置文件为:
1
2
3
4
5
6
7
8
9
10
11
12
13
14
15
16
<?xml version="1.0"?> <!DOCTYPE hibernate-mapping PUBLIC "-//Hibernate/Hibernate Mapping DTD 3.0//EN" "http://hibernate.sourceforge.net/hibernate-mapping-3.0.dtd"> <hibernate-mapping package ="shiyanlou.ssh.model" > <class name ="User" table ="ssh_test" > <id name ="id" column ="id" > </id > <property name ="name" column ="name" > </property > <property name ="company" column ="company" > </property > </class > </hibernate-mapping >
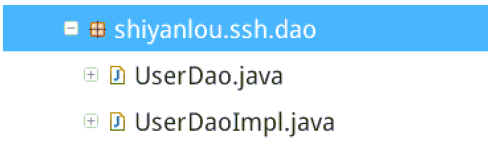
五、Dao 在 dao 下新建一个 UserDao.java 接口,以及它的实现类 UserDaoImpl.java:
1. UserDao.java 1 2 3 4 5 6 7 8 9 10 11 12 13 14 15 16 17 18 19 20 21 22 23 24 25 26 27 package shiyanlou.ssh.dao;import java.util.List;import shiyanlou.ssh.model.User;public interface UserDao public boolean checkUser (User user) public boolean addUser (User user) public boolean deleteUser (int id) public boolean updateUser (User user) public List<User> queryUser (User user) public User queryById (int id) public List<User> queryAll () }
2. UserDaoImpl.java 1 2 3 4 5 6 7 8 9 10 11 12 13 14 15 16 17 18 19 20 21 22 23 24 25 26 27 28 29 30 31 32 33 34 35 36 37 38 39 40 41 42 43 44 45 46 47 48 49 50 51 52 53 54 55 56 57 58 59 60 61 62 63 64 65 66 67 68 69 70 71 72 73 74 75 76 77 78 79 80 81 82 83 84 85 86 87 88 89 90 91 92 93 94 95 96 97 98 99 100 101 102 103 104 105 106 107 108 109 110 111 112 113 114 115 116 117 118 119 120 121 122 123 124 125 126 127 128 129 130 131 132 133 134 135 136 137 138 139 140 141 142 143 144 145 146 147 148 149 150 151 152 153 154 155 156 157 158 package shiyanlou.ssh.dao; import java.util.ArrayList;import java.util.List;import org.hibernate.Query;import org.hibernate.Session;import org.hibernate.SessionFactory;import shiyanlou.ssh.model.User;public class UserDaoImpl implements UserDao { private SessionFactory sessionFactory; public SessionFactory getSessionFactory() { return sessionFactory; } public void setSessionFactory(SessionFactory sessionFactory) { this.sessionFactory = sessionFactory; } @Override public boolean checkUser(User user) { Session session = sessionFactory.openSession() ; session.beginTransaction() ; Query query = session.createQuery(" from User u where u.id=:id and u.name=:name" ) ; query.setParameter("id" , user.getId() ) ; query.setParameter("name" , user.getName() ) ; User u = (User) query.uniqueResult() ; session.getTransaction() .commit() ; session.close() ; if (null != u ) { return true ; } return false ; } @Override public boolean addUser(User user) { Session session = sessionFactory.openSession() ; session.beginTransaction() ; session.save(user) ; session.getTransaction() .commit() ; session.close() ; return true ; } @Override public boolean deleteUser(int id) { Session session = sessionFactory.openSession() ; session.beginTransaction() ; User u = (User) session.get(User.class, id) ; session.delete(u) ; session.getTransaction() .commit() ; session.close() ; return true ; } @Override public boolean updateUser(User user) { Session session = sessionFactory.openSession() ; session.beginTransaction() ; session.update(user) ; session.getTransaction() .commit() ; session.close() ; return true ; } @Override public List<User> queryUser(User user) { Session session = sessionFactory.openSession() ; session.beginTransaction() ; StringBuffer hq = new StringBuffer(" from User u where 1=1" ) ; ArrayList<String> params = new ArrayList<String>() ; if (user.getName() != null && !"" .equals(user.getName() ) ) { hq.append(" and u.name=?" ) ; params.add(user.getName() ) ; } if (user.getCompany() != null && !"" .equals(user.getCompany() ) ) { hq.append(" and u.company=?" ) ; params.add(user.getCompany() ) ; } Query query = session.createQuery(hq.toString() ) ; for (int i = 0 ; i < params.size() ; i++) { query.setString(i, params.get(i) ) ; } List<User> users = query.list() ; session.getTransaction() .commit() ; session.close() ; return users; } @Override public User queryById(int id) { Session session = sessionFactory.openSession() ; session.beginTransaction() ; User u = (User) session.get(User.class, id) ; session.getTransaction() .commit() ; session.close() ; return u; } @Override public List<User> queryAll() { Session session = sessionFactory.openSession() ; session.beginTransaction() ; Query query = session.createQuery(" from User u" ) ; List<User> users = query.list() ; session.getTransaction() .commit() ; session.close() ; return users; } }
3. hibernate.cfg.xml 在 Java Resources/src 目录下,新建 Hibernate 配置文件 hibernate.cfg.xml:
1 2 3 4 5 6 7 8 9 10 11 12 13 14 15 16 17 18 19 20 21 22 23 24 25 26 27 28 29 30 31 32 33 34 <?xml version='1.0' encoding='utf-8'?> <!DOCTYPE hibernate-configuration PUBLIC "-//Hibernate/Hibernate Configuration DTD 3.0//EN" "http://hibernate.sourceforge.net/hibernate-configuration-3.0.dtd"> <hibernate-configuration > <session-factory > <property name ="connection.driver_class" > com.mysql.jdbc.Driver</property > <property name ="connection.url" > jdbc:mysql://localhost:3306/ssh</property > <property name ="connection.username" > root</property > <property name ="connection.password" > </property > <property name ="dialect" > org.hibernate.dialect.MySQLDialect</property > <property name ="current_session_context_class" > thread</property > <property name ="show_sql" > true</property > <property name ="format_sql" > true</property > <property name ="hbm2ddl.auto" > update</property > <mapping resource ="shiyanlou/ssh/model/User.hbm.xml" /> </session-factory > </hibernate-configuration >
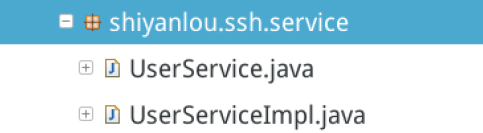
六、Service 在 service 下新建一个 UserService.java 接口,以及它的实现类 UserServiceImpl.java,service 为 dao 的上层,它是直接调用 dao 层的相关操作的,相对来说要简单很多,因此这里也不详细解释了。
1. UserService.java 1 2 3 4 5 6 7 8 9 10 11 12 13 14 15 16 package shiyanlou.ssh.service;import java.util.List;import shiyanlou.ssh.model.User;public interface UserService public boolean checkUser (User user) public boolean addUser (User user) public boolean deleteUser (int id) public boolean updateUser (User user) public List<User> queryUser (User user) public User queryById (int id) public List<User> queryAll () }
2. UserServiceImpl.java 1 2 3 4 5 6 7 8 9 10 11 12 13 14 15 16 17 18 19 20 21 22 23 24 25 26 27 28 29 30 31 32 33 34 35 36 37 38 39 40 41 42 43 44 45 46 47 48 49 50 51 52 53 54 55 56 57 58 59 60 61 62 63 64 package shiyanlou.ssh.service; import java.util.List ;import shiyanlou.ssh.dao.UserDao ;import shiyanlou.ssh.model.User ;public class UserServiceImpl implements UserService { private UserDao userDao; public UserDao getUserDao() { return userDao; } public void setUserDao(UserDao userDao) { this.userDao = userDao; } @Override public boolean checkUser(User user) { // TODO Auto -generated method stub if ( userDao.checkUser(user) ) { return true ; } return false ; } @Override public boolean addUser(User user) { // TODO Auto -generated method stub return userDao.addUser(user); } @Override public boolean deleteUser(int id) { // TODO Auto -generated method stub return userDao.deleteUser(id); } @Override public boolean updateUser(User user) { // TODO Auto -generated method stub return userDao.updateUser(user); } @Override public List <User > queryUser(User user) { // TODO Auto -generated method stub return userDao.queryUser(user); } @Override public User queryById(int id) { // TODO Auto -generated method stub return userDao.queryById(id); } @Override public List <User > queryAll() { // TODO Auto -generated method stub return userDao.queryAll(); } }
七、Action 在 action 包下,新建类 UserAction.java,action 为 service 的上层,所以它会调用 service:
1. UserAction.java 1 2 3 4 5 6 7 8 9 10 11 12 13 14 15 16 17 18 19 20 21 22 23 24 25 26 27 28 29 30 31 32 33 34 35 36 37 38 39 40 41 42 43 44 45 46 47 48 49 50 51 52 53 54 55 56 57 58 59 60 61 62 63 64 65 66 67 68 69 70 71 72 73 74 75 76 77 78 79 80 81 82 83 84 85 86 87 88 89 90 91 92 package shiyanlou.ssh.action;import java.util.Map;import shiyanlou.ssh.model.User;import shiyanlou.ssh.service.UserService;import com.opensymphony.xwork2.ActionContext;import com.opensymphony.xwork2.ActionSupport;public class UserAction extends ActionSupport * */ private static final long serialVersionUID = 1 L; private User user; private UserService userService; private Map<String, Object> request; private Map<String, Object> session; public User getUser () { return user; } public void setUser (User user) this .user = user; } public UserService getUserService () { return userService; } public void setUserService (UserService userService) this .userService = userService; } public String list () { request = (Map)ActionContext.getContext().get("request" ); request.put("users" , userService.queryAll()); return "success" ; } public String checkUser () { boolean flag = userService.checkUser(user); if (flag) { session = ActionContext.getContext().getSession(); session.put("user1" , user); return list () } return "error" ; } public String deleteUser () { userService.deleteUser(user.getId()); return list () } public String addUser () { userService.addUser(user); return list () } public String updateUser () { user = userService.queryById(user.getId()); return "update" ; } public String updateUserImpl () { userService.updateUser(user); return list () } public String queryUser () { request = (Map)ActionContext.getContext().get("request" ); request.put("users2" , userService.queryUser(user)); request.put("tag" , 2 ); return list () } }
2. beans.xml 在 Java Resources/src 目录下新建 Spring 配置文件 beans.xml:
1 2 3 4 5 6 7 8 9 10 11 12 13 14 15 16 17 18 19 20 21 22 23 24 25 26 27 28 29 30 31 32 33 34 35 36 37 38 39 40 41 42 43 44 45 46 47 48 49 50 51 52 53 54 55 56 <?xml version="1.0" encoding="UTF-8"?> <beans xmlns ="http://www.springframework.org/schema/beans" xmlns:xsi ="http://www.w3.org/2001/XMLSchema-instance" xmlns:context ="http://www.springframework.org/schema/context" xmlns:aop ="http://www.springframework.org/schema/aop" xmlns:tx ="http://www.springframework.org/schema/tx" xsi:schemaLocation ="http://www.springframework.org/schema/beans http://www.springframework.org/schema/beans/spring-beans-3.0.xsd http://www.springframework.org/schema/context http://www.springframework.org/schema/context/spring-context-3.0.xsd http://www.springframework.org/schema/tx http://www.springframework.org/schema/tx/spring-tx-3.0.xsd http://www.springframework.org/schema/aop http://www.springframework.org/schema/aop/spring-aop-3.2.xsd" default-autowire ="byName" > <bean id ="sessionFactory" class ="org.springframework.orm.hibernate3.annotation.AnnotationSessionFactoryBean" > <property name ="configLocation" value ="classpath:hibernate.cfg.xml" > </property > </bean > <bean id ="txManager" class ="org.springframework.orm.hibernate3.HibernateTransactionManager" > <property name ="sessionFactory" ref ="sessionFactory" /> </bean > <aop:config > <aop:pointcut expression ="execution(public * shiyanlou.ssh.service..*.*(..))" id ="businessService" /> <aop:advisor advice-ref ="txAdvice" pointcut-ref ="businessService" /> </aop:config > <tx:advice id ="txAdvice" transaction-manager ="txManager" > <tx:attributes > <tx:method name ="check*" read-only ="true" /> </tx:attributes > </tx:advice > <bean id ="userDao" class ="shiyanlou.ssh.dao.UserDaoImpl" > <property name ="sessionFactory" ref ="sessionFactory" > </property > </bean > <bean id ="userService" class ="shiyanlou.ssh.service.UserServiceImpl" > <property name ="userDao" ref ="userDao" > </property > </bean > <bean id ="userAction" class ="shiyanlou.ssh.action.UserAction" > <property name ="userService" ref ="userService" > </property > </bean > </beans >
3. structs.xml 同样在 Java Resources/src 目录下,新建 Struts 配置文件 struts.xml:
1 2 3 4 5 6 7 8 9 10 11 12 13 14 15 16 17 18 19 20 21 22 <?xml version="1.0" encoding="UTF-8" ?> <!DOCTYPE struts PUBLIC "-//Apache Software Foundation//DTD Struts Configuration 2.3//EN" "http://struts.apache.org/dtds/struts-2.3.dtd"> <struts > <constant name ="struts.devMode" value ="true" > </constant > <constant name ="struts.enable.DynamicMethodInvocation" value ="true" /> <package name ="user" extends ="struts-default" namespace ="/" > <action name ="user" class ="shiyanlou.ssh.action.UserAction" > <result name ="error" > /error.jsp</result > <result name ="success" > /success.jsp</result > <result name ="update" > /updateuser.jsp</result > </action > </package > </struts >
八、JSP 现在编码工作进入最后的阶段了,我们需要做的,就是根据前面的 Struts 的配置以及各种业务处理逻辑,建立各种 JSP 页面。
实验中,所有的页面,都在 WebContent/ 下新建。
1. login.jsp 登录页面,也是程序启动的默认首页,登录时验证 id 和 name 是否存在于数据库中。
1 2 3 4 5 6 7 8 9 10 11 12 13 14 15 16 17 18 19 20 21 22 23 24 25 26 27 28 29 30 31 <%@ page language="java" contentType="text/html; charset=UTF-8" pageEncoding="UTF-8" %> <% String path = request .getContextPath();String basePath = request .getScheme()+"://" +request .getServerName()+":" +request .getServerPort()+path+"/" ;%> <!DOCTYPE html PUBLIC "-//W3C//DTD HTML 4.01 Transitional//EN" "http://www.w3.org/TR/html4/loose.dtd"> <html > <head > <meta http-equiv ="Content-Type" content ="text/html; charset=UTF-8" > <title > Login Page</title > </head > <body > <center > <h1 > Please Login First</h1 > <br /> <form action =" <%=basePath%> user!checkUser.action" method ="post" > User Id:<input type ="text" name ="user.id" style ="width: 100px;" /> <br /> User Name<input type ="text" name ="user.name" style ="width: 100px;" /> <br /> <input type ="submit" value ="Login" /> </form > </center > </body > </html >
2. success.jsp 登录验证成功,进入管理页面。
1 2 3 4 5 6 7 8 9 10 11 12 13 14 15 16 17 18 19 20 21 22 23 24 25 26 27 28 29 30 31 32 33 34 35 36 37 38 39 40 41 42 43 44 45 46 47 48 49 50 51 52 53 54 55 56 57 58 59 60 61 62 63 64 65 66 67 68 69 70 71 72 73 74 75 76 77 78 79 80 81 82 83 84 85 86 87 88 89 90 91 92 93 94 95 <%@ page language="java" import="java.util.*" contentType="text/html; charset=UTF-8" pageEncoding="UTF-8" %> <% String path = request .getContextPath();String basePath = request .getScheme()+"://" +request .getServerName()+":" +request .getServerPort()+path+"/" ;%> <%@taglib uri="http://java.sun.com/jsp/jstl/core" prefix="c" %> <!DOCTYPE html PUBLIC "-//W3C//DTD HTML 4.01 Transitional//EN" "http://www.w3.org/TR/html4/loose.dtd"> <html > <head > <meta http-equiv ="Content-Type" content ="text/html; charset=UTF-8" > <title > Welcome</title > <style type ="text/css" > td { text-align : center width : 100px } </style > </head > <body > <div align ="right" > Welcome, ${user1.name } | <a href ="logout.jsp" > Exit</a > </div > <center > <table border ="1" > <tr > <td > user id</td > <td > user name</td > <td > company</td > <td colspan ="2" style ="center" > Options</td > </tr > <c:forEach items ="${users}" var ="u" > <tr > <td > ${u.id}</td > <td > ${u.name}</td > <td > ${u.company}</td > <td > <a href ="user!deleteUser.action?user.id=${u.id}" > Delete</a > </td > <td > <a href ="user!updateUser.action?user.id=${u.id}" > Modify</a > </td > </tr > </c:forEach > </table > <br /> <input type ="submit" value ="Add User" onclick ="window.location.href='adduser.jsp'" /> </center > <br > <br > <br > <br > <center > <form action ="user!queryUser.action" method ="post" > user name<input type ="text" name ="user.name" /> company<input type ="text" name ="user.company" /> <input type ="submit" value ="Search" /> </form > </center > <br > <br > <br > <br > <c:if test ="${tag>0}" > <center > <table border ="1" > <tr > <td > user id</td > <td > user name</td > <td > company</td > </tr > <c:forEach items ="${users2}" var ="u" > <tr > <td > ${u.id}</td > <td > ${u.name}</td > <td > ${u.company }</td > </tr > </c:forEach > </table > </center > </c:if > </body > </html >
3. error.jsp 登录验证失败,给出一个错误页面提示即可,非常简单。
1 2 3 4 5 6 7 8 9 10 11 12 <%@ page language ="java" contentType ="text/html; charset=UTF-8" pageEncoding ="UTF-8" % > <!DOCTYPE html PUBLIC "-//W3C//DTD HTML 4.01 Transitional//EN" "http://www.w3.org/TR/html4/loose.dtd"> <html > <head > <meta http-equiv ="Content-Type" content ="text/html; charset=UTF-8" > <title > Sorry!</title > </head > <body > Login failed! </body > </html >
4. adduser.jsp 增加用户的页面,注意 id 为主键,因此不能为空,也不能和其他的重复。把表单提交给 addUser Action 就可以了。
1 2 3 4 5 6 7 8 9 10 11 12 13 14 15 16 17 18 19 20 21 22 23 24 25 26 27 28 <%@ page language="java" contentType="text/html; charset=UTF-8" pageEncoding="UTF-8" %> <% String path = request .getContextPath();String basePath = request .getScheme()+"://" +request .getServerName()+":" +request .getServerPort()+path+"/" ;%> <!DOCTYPE html PUBLIC "-//W3C//DTD HTML 4.01 Transitional//EN" "http://www.w3.org/TR/html4/loose.dtd"> <html > <head > <meta http-equiv ="Content-Type" content ="text/html; charset=UTF-8" > <title > Add New User</title > </head > <body > <center > <h1 > Add User</h1 > <br /> user id cannot be null or same as others <form action ="user!addUser.action" method ="post" > user id<input type ="text" name ="user.id" /> <br /> user name<input type ="text" name ="user.name" /> <br /> company<input type ="text" name ="user.company" /> <br /> <input type ="submit" value ="Add" /> </form > </center > </body > </html >
5. updateuser.jsp 修改用户信息,同上面类似(不提供 id 修改)。注意这里的 Action 为 updateUserImpl。
1 2 3 4 5 6 7 8 9 10 11 12 13 14 15 16 17 18 19 20 21 22 23 24 25 26 27 28 <%@ page language="java" contentType="text/html; charset=UTF-8" pageEncoding="UTF-8" %> <% String path = request .getContextPath();String basePath = request .getScheme()+"://" +request .getServerName()+":" +request .getServerPort()+path+"/" ;%> <!DOCTYPE html PUBLIC "-//W3C//DTD HTML 4.01 Transitional//EN" "http://www.w3.org/TR/html4/loose.dtd"> <html > <head > <meta http-equiv ="Content-Type" content ="text/html; charset=UTF-8" > <title > Modify User Info</title > </head > <body > <center > <h1 > Modify User Info</h1 > <br /> <form action ="user!updateUserImpl.action" method ="post" > <input type ="hidden" name ="user.id" value ="${user.id}" readonly ="readonly" /> <br /> user name<input type ="text" name ="user.name" value ="${user.name}" /> <br /> company<input type ="text" name ="user.company" value ="${user.company}" /> <br /> <input type ="submit" value ="OK" /> </form > </center > </body > </html >
6. logout.jsp 退出网站,把 session 清空,再设置页面跳转到首页登录页面即可。
1 2 3 4 5 6 7 <%@ page language="java" contentType="text/html; charset=UTF-8" pageEncoding="UTF-8" %> <% session.invalidate () ; response .sendRedirect ("login .jsp ");%>
九、运行测试 1. 登录 右击项目,选择 Run As —> Run On Server,稍等片刻,即可看到登录页面:
输入下面的命令,可以看到该数据库中,已经有 ssh_test 这张 table 了,但是目前还是张空表:
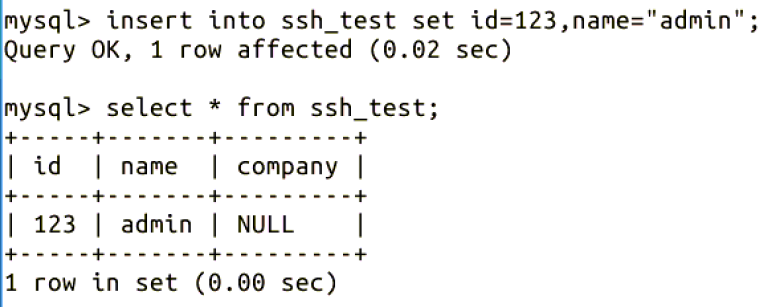
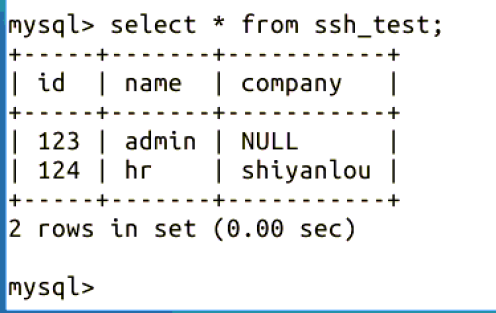
因为登录时我们要检查输入的数据是否存在与数据库中,因此我们先插入一条数据,例如:
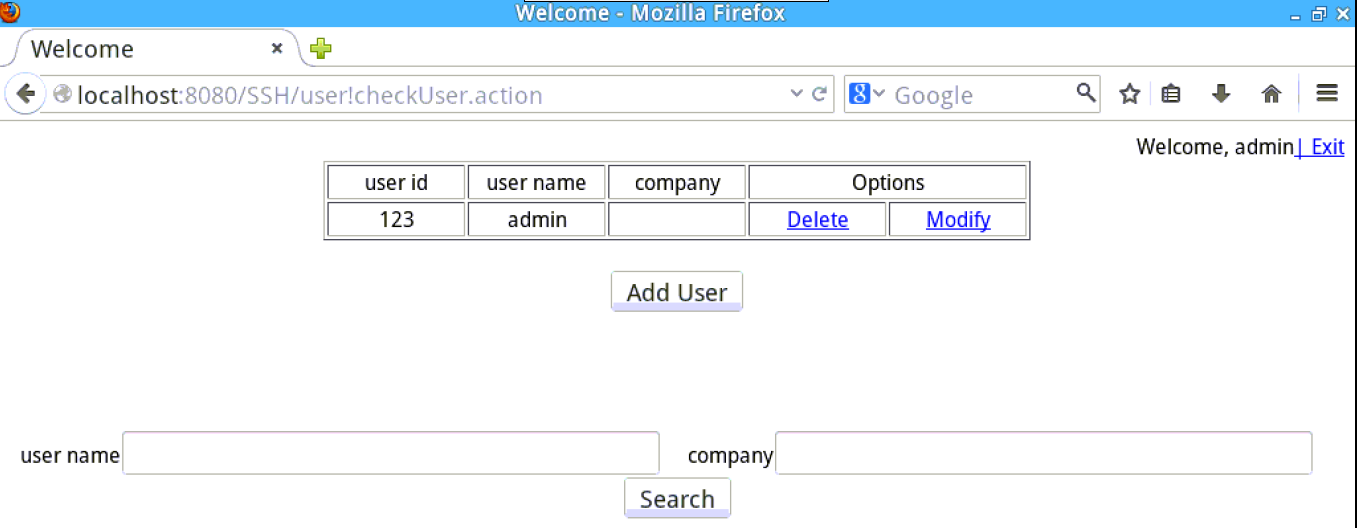
再输入刚刚插入的数据,即可登录并进入管理页面(可以看到刚刚插入的数据,显示在页面上了):
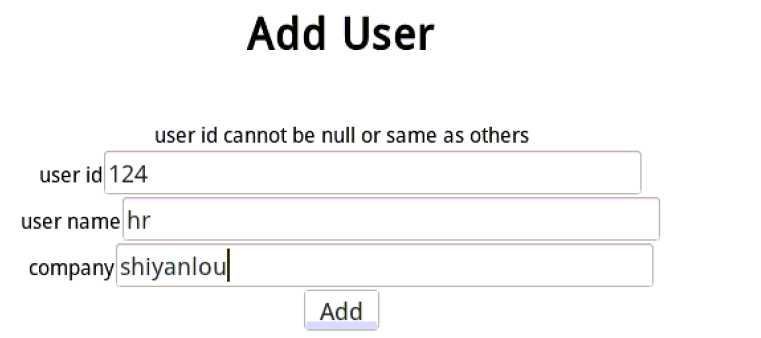
2. 用户管理(增删改查) (1)新增用户 点击 Add User 按钮,输入数据来新增用户,例如:
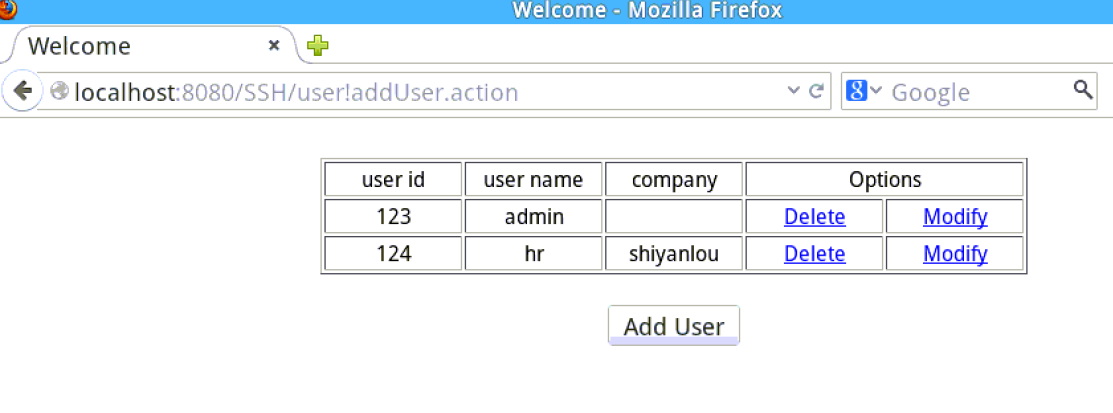
点击 Add 即可添加成功,页面展示:
对比验证后台数据库中表的数据,也是一致的:
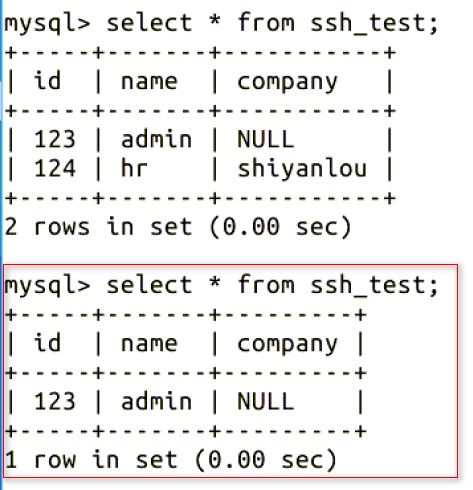
(2)删除用户 我们把上面新增的 id 为 124 的用户删除掉,点击 Options 中的 Delete 即可。
对比验证后台数据库中表的数据(保持一致),可以看到之前是两条数据,现在也只有一条了:
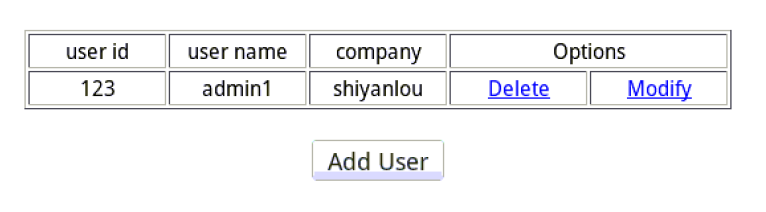
(3)修改用户信息 点击 Options 中的 Modify 修改用户信息,例如把 id 为 123 的用户信息修改为:
可以看到修改成功了:
同样,你也可以验证后台数据库也是一致的。
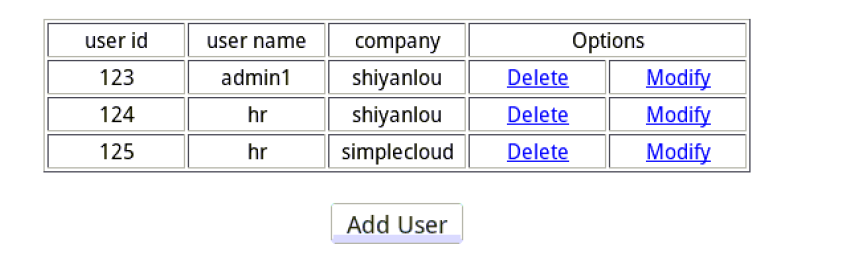
(4)查找用户 为了演示查找的特性,我们先多新建几个用户,例如:
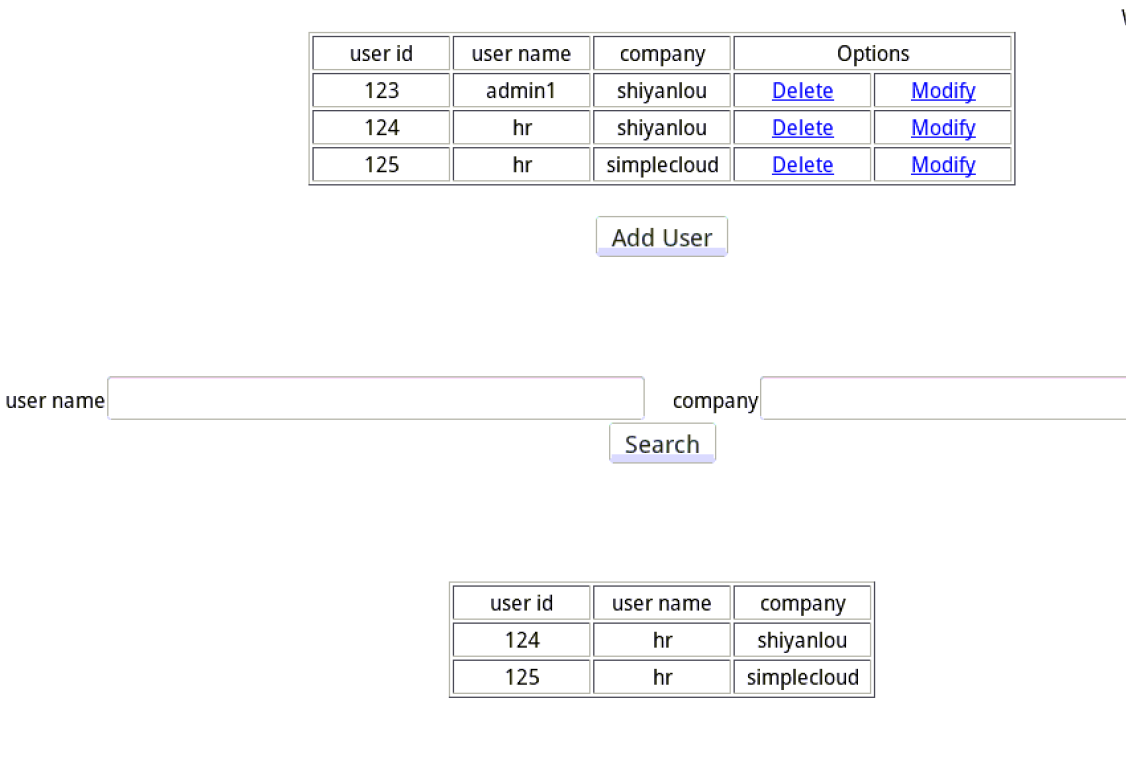
我们先查找 name="hr" (company 为空)的用户,结果为(最后一个表格是查找结果):
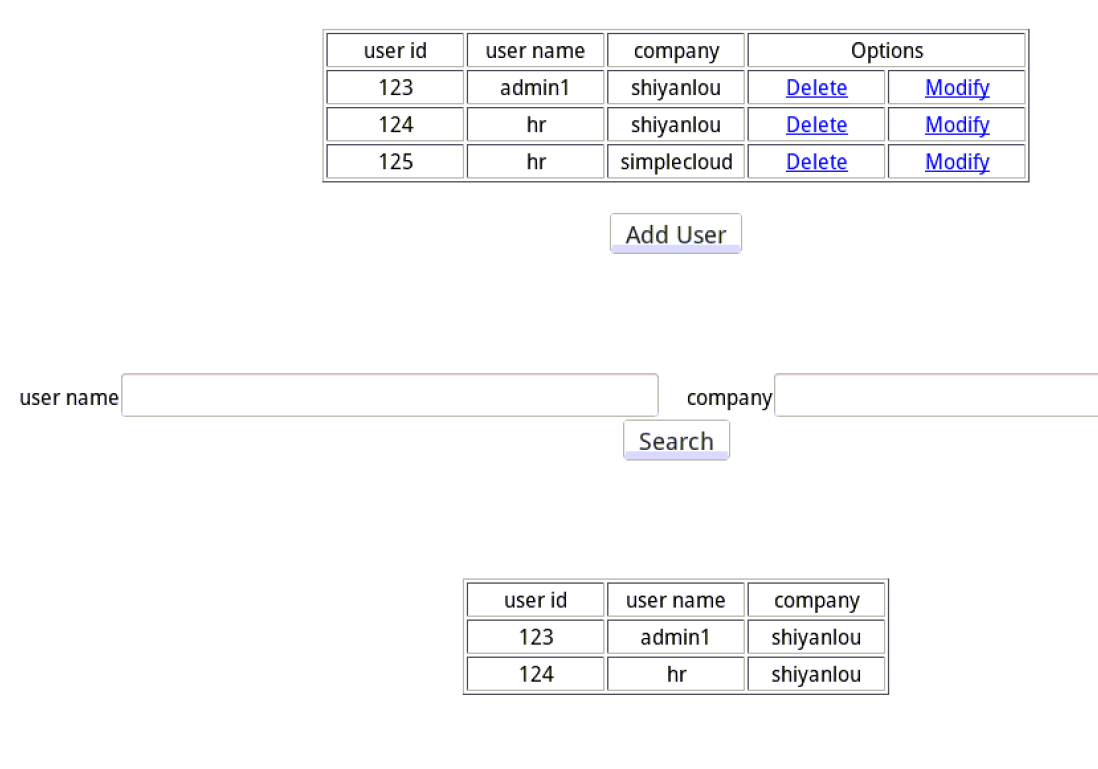
再查找 company="shiyanlou" (name 为空)的用户,结果为:
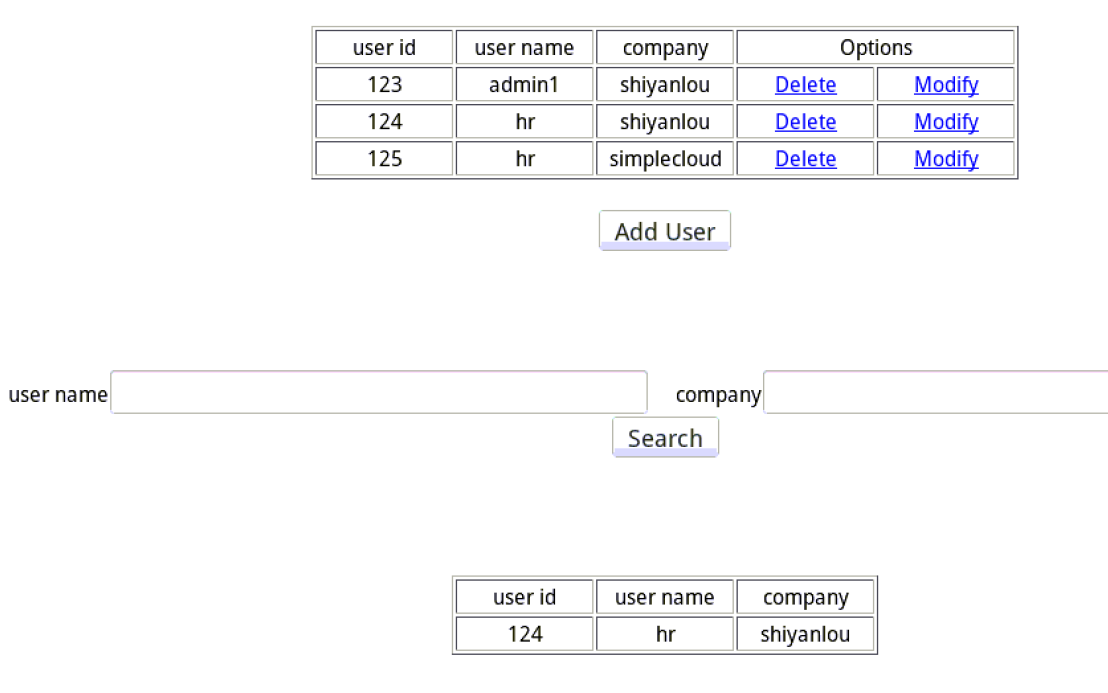
最后,再查找 name="hr" 并且 company="shiyanlou" 的用户:
可以看到,条件查找是很灵活、多样的。
十、作业思考